
Page 9 - Hawaii Island MidWeek - January 18, 2023
P. 9
h my, where do I be- dery journal? Basically, you the stitching community are a beginner embroiderer. You as the year goes along, I will gin with this week’s will create a small tapestry the most encouraging, posi- should check out her Instagram improve. I like this project project? It’s an ex- filled with little stitched motifs tive and kind people I’ve met (@thestircrazycrafter) for tips because it will also make me
citing discovery I made in that represent your daily life. online. There are many online and ideas. What I really love think on how I can share my
2021. I came upon an article about embroidery journaling and thought it was so cool! I was very excited to start one in 2022 and I did. But like a lot of New Year’s resolutions, I didn’t keep up with it. So, here we are in 2023 and I am giving it another try.
Preparation:
Pre-wash fabric before stitching. To prevent unraveling, tape up or sew a finish along the fabric edges. You can use a sewing machine and do a zig zag stitch all around or something like a blanket stitch by hand. As an option, wrap the inner hoop with bias tape or fabric strips. Stitch the ends together to keep in place. This extra layer of fabric helps keep the main fabric taut and prevent it from shifting as you embroider.
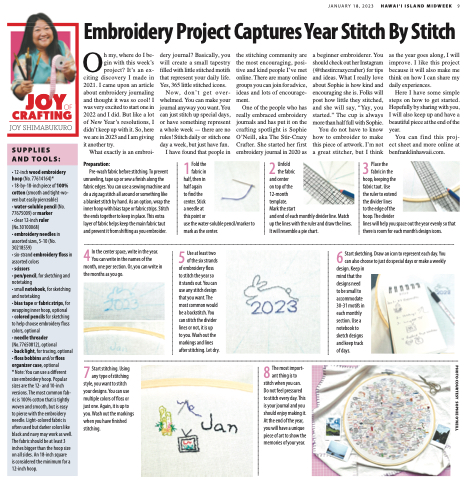
4 In the center space, write in the year. You can write in the names of the month, one per section. Or, you can write in
the months as you go.
7 Start stitching. Using any type of stitching
style, you want to stitch your designs. You can use multiple colors of floss or just one. Again, it is up to you. Wash out the markings when you have finished stitching.
daily experiences.
Here I have some simple
JANUARY 18, 2023 HAWAI‘I ISLAND MIDWEEK 9
OEmbroidery Project Captures Year Stitch By Stitch
SUPPLIES AND TOOLS:
• 12-inch wood embroidery hoop (No. 77614164)*
• 18-by-18-inch piece of 100% cotton (smooth and tight-wo- ven but easily pierceable)
• water-soluble pencil (No. 77675009) or marker
• clear 12-inch ruler (No.30100068)
• embroidery needles in assorted sizes, 5-10 (No. 30218559)
• six-strand embroidery floss in assorted colors
• scissors
• pen/pencil, for sketching and notetaking
• small notebook, for sketching and notetaking
• bias tape or fabric strips, for wrapping inner hoop, optional
• colored pencils for sketching to help choose embroidery floss colors, optional
• needle threader (No.77650812), optional
• back light, for tracing, optional • floss bobbins and/or floss organizer case, optional
* Note: You can use a different size embroidery hoop. Popular sizes are the 12- and 10-inch versions. The most common fab- ric is 100% cotton that is tightly woven and smooth, but is easy
to pierce with the embroidery needle. Light-colored fabric is often used but darker colors like black and navy may work as well. The fabric should be at least 3 inches bigger than the hoop size on all sides. An 18-inch square
is considered the minimum for a 12-inch hoop.
What exactly is an embroi-
day a week, but just have fun. I have found that people in
One of the people who has really embraced embroidery journals and has put it on the crafting spotlight is Sophie O’Neill, aka The Stir-Crazy Crafter. She started her first embroidery journal in 2020 as
You do not have to know how to embroider to make this piece of artwork. I’m not a great stitcher, but I think
You can find this proj- ect sheet and more online at benfranklinhawaii.com.
Yes, 365 little stitched icons. Now, don’t get over- whelmed. You can make your journal anyway you want. You can just stitch up special days, or have something represent a whole week — there are no rules! Stitch daily or stitch one
groups you can join for advice, ideas and lots of encourage- ment.
about Sophie is how kind and encouraging she is. Folks will post how little they stitched, and she will say, “Yay, you started.” The cup is always more than half full with Sophie.
steps on how to get started. Hopefully by sharing with you, I will also keep up and have a beautiful piece at the end of the year.
1 Fold the fabric in half, then in
half again
to find the
center. Stick
a needle at
this point or
use the water-soluble pencil/marker to mark as the center.
5 Use at least two of the six strands
of embroidery floss to stitch the year so
it stands out. You can use any stitch design that you want. The most common would be a backstitch. You can stitch the divider lines or not, it is up
to you. Wash out the markings and lines after stitching. Let dry.
2 Unfold the fabric
and center
on top of the
12-month
template.
Mark the start
and end of each monthly divider line. Match up the lines with the ruler and draw the lines. It will resemble a pie chart.
3 Place the fabric in the
hoop, keeping the
fabric taut. Use
the ruler to extend
the divider lines
to the edge of the
hoop. The divider
lines will help you space out the year evenly so that there is room for each month’s design icons.
6 Start sketching. Draw an icon to represent each day. You can also choose to just do special days or make a weekly
design. Keep in mind that the designs need to be small to accommodate 30-31 motifs in each monthly section. Use a notebook to sketch designs and keep track of days.
8 The most import- ant thing is to
stitch when you can. Do not feel pressured to stitch every day. This is your journal and you should enjoy making it. At the end of the year, you will have a unique piece of art to show the memories of your year.
PHOTO COURTESY SOPHIE O’NEILL
