
Page 4 - Hawaii Island MidWeek - Jan 12, 2022
P. 4
4 H
EEK JANUARY 12, 2022
H
A
A
W
W
A
A
I
I
‘
‘
I
I
I
I
S
S
L
L
A
A
N
N
D
D
M
M
I
I
D
D
W
W
E
AThe Perfect Project For A Roaring Good Time
ccording to the lunar cal- ter tigers are known for a strong a treat bag. You can also use it to endar, 2022 is the Year of self-esteem and learning ability. make cards or other items. You can the Tiger. More specifical- That’s awesome for those who find a project sheet plus many more
ly, it is the year of the water tiger. It want to learn how to make things. at benfranklinhawaii.com.
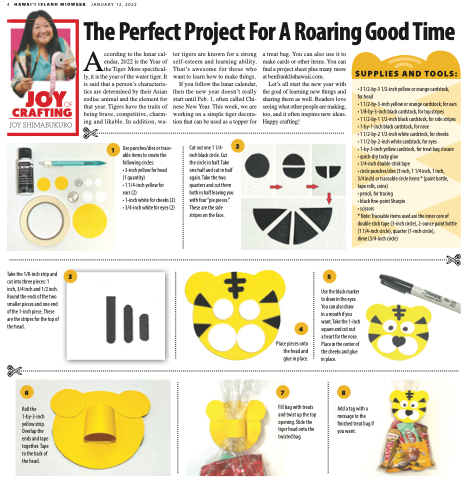
SUPPLIES AND TOOLS:
• 3 1/2-by-3 1/2-inch yellow or orange cardstock,
for head
• 1 1/2-by-3-inch yellow or orange cardstock, for ears • 1/8-by-3-inch black cardstock, for top stripes
• 1 1/2-by-1 1/2-inch black cardstock, for side stripes • 1-by-1-inch black cardstock, for nose
• 1 1/2-by-2 1/2-inch white cardstock, for cheeks
• 1 1/2-by-2-inch white cardstock, for eyes
• 1-by-3-inch yellow cardstock, for treat bag closure
• quick-dry tacky glue
• 1/4-inch double-stick tape
• circle punches/dies (3 inch, 1 1/4 inch, 1 inch,
3/4 inch) or traceable circle items * (paint bottle, tape rolls, coins)
• pencil, for tracing
• black fine-point Sharpie
• scissors
* Note: Traceable items used are the inner core of double stick tape (3-inch circle), 2-ounce paint bottle (1 1/4-inch circle), quarter (1-inch circle),
dime (3/4-inch circle)
is said that a person’s characteris- tics are determined by their Asian zodiac animal and the element for that year. Tigers have the traits of being brave, competitive, charm- ing and likable. In addition, wa-
If you follow the lunar calendar, then the new year doesn’t really start until Feb. 1, often called Chi- nese New Year. This week, we are working on a simple tiger decora- tion that can be used as a topper for
Let’s all start the new year with the goal of learning new things and sharing them as well. Readers love seeing what other people are making, too, and it often inspires new ideas. Happy crafting!
1
Use punches/dies or trace- able items to create the following circles:
• 3-inch yellow for head
(1 quantity)
• 1 1/4-inch yellow for
ears (2)
• 1-inch white for cheeks (2) • 3/4-inch white for eyes (2)
Cut out one 1 1/4-
inch black circle. Cut the circle in half. Take one half and cut in half again. Take the two quarters and cut them both in half leaving you with four “pie pieces.” These are the side stripes on the face.
2
Take the 1/8-inch strip and cut into three pieces: 1 inch, 3/4 inch and 1/2 inch. Round the ends of the two smaller pieces and one end of the 1-inch piece. These are the stripes for the top of the head.
35
4
Place pieces onto the head and glue in place.
Use the black marker to draw in the eyes. You can also draw
in a mouth if you want. Take the 1-inch square and cut out
a heart for the nose. Place in the center of the cheeks and glue in place.
678
Roll the 1-by-3-inch yellow strip. Overlap the ends and tape together. Tape to the back of the head.
Fill bag with treats and twist up the top opening. Slide the tiger head onto the twisted bag.
Add a tag with a message to the finished treat bag if you want.
