
Page 9 - Hawaii Island MidWeek - April 20, 2022
P. 9
enjoy cute bunnies and treats year-round! This week’s proj- ect is super simple and you can probably use some of your paper scraps for it, too.
and see if some new idea pops in our heads — and often times it does! Then IsawthatIcouldtuckina few pieces of candy and use one of the flaps to close the open bottom.
or brunches. Just like bun- nies, the ideas just multiply!
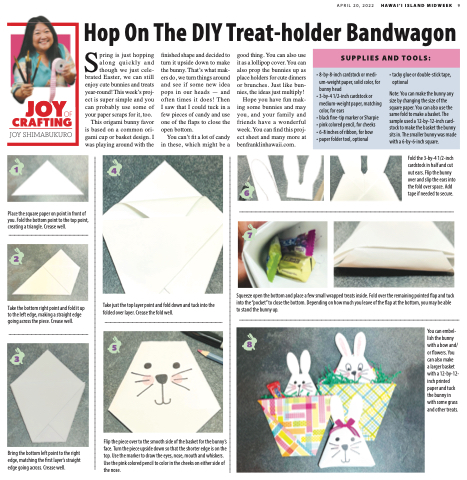
Squeeze open the bottom and place a few small wrapped treats inside. Fold over the remaining pointed flap and tuck into the “pocket” to close the bottom. Depending on how much you leave of the flap at the bottom, you may be able to stand the bunny up.
You can embel- lish the bunny with a bow and/ or flowers. You can also make
a larger basket with a 12-by-12- inch printed paper and tuck the bunny in with some grass and other treats.
This origami bunny favor is based on a common ori- gami cup or basket design. I was playing around with the
You can’t fit a lot of candy in these, which might be a
Hope you have fun mak- ing some bunnies and may you, and your family and friends have a wonderful week. You can find this proj- ect sheet and many more at benfranklinhawaii.com.
APRIL 20, 2022 HAWAI‘I ISLAND MIDWEEK 9
HSop On The DIY Treat-holder Bandwagon
pring is just hopping finished shape and decided to good thing. You can also use along quickly and turn it upside down to make it as a lollipop cover. You can though we just cele- the bunny. That’s what mak- also prop the bunnies up as
SUPPLIES AND TOOLS:
• 8-by-8-inch cardstock or medi- um-weight paper, solid color, for bunny head
• 3-by-4 1/2-inch cardstock or medium-weight paper, matching color, for ears
• black fine-tip marker or Sharpie
• pink colored pencil, for cheeks
• 6-8 inches of ribbon, for bow
• paper folder tool, optional
• tacky glue or double-stick tape, optional
Note: You can make the bunny any size by changing the size of the square paper. You can also use the same fold to make a basket. The sample used a 12-by-12-inch card- stock to make the basket the bunny sits in. The smaller bunny was made with a 6-by-6-inch square.
brated Easter, we can still ers do, we turn things around place holders for cute dinners
Fold the 3-by-4 1/2-inch cardstock in half and cut out ears. Flip the bunny over and slip the ears into the fold over space. Add tape if needed to secure.
Place the square paper on point in front of you. Fold the bottom point to the top point, creating a triangle. Crease well.
Take the bottom right point and fold it up to the left edge, making a straight edge going across the piece. Crease well.
Take just the top layer point and fold down and tuck into the folded over layer. Crease the fold well.
Flip the piece over to the smooth side of the basket for the bunny’s face. Turn the piece upside down so that the shorter edge is on the top. Use the marker to draw the eyes, nose, mouth and whiskers. Use the pink colored pencil to color in the cheeks on either side of the nose.
Bring the bottom left point to the right edge, matching the first layer’s straight edge going across. Crease well.
